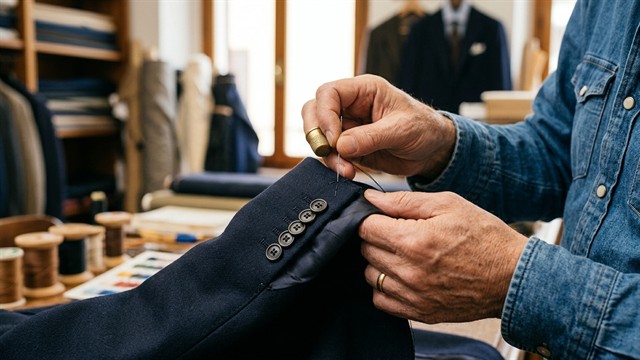
Processing the vents on the sleeve of a jacket, cardigan or coat is one of the most important couture knots in the top range. A neat closed vent with smooth “envelope” corners and a cleanly hemmed lining instantly gives away the high class of the product. In this step-by-step instruction, we will analyze in detail the duplication technology, the formation of the ideal angle, the assembly of the slot and its proper connection with the sleeve lining.
Contents of the article
- Anatomy of a sleeve vent: upper and lower side
- Step 1. Duplicating and marking spline allowances
- Step 2. Processing the corner with an “envelope” (45 degree angle)
- Step 3. Stitching the elbow seam of the sleeve and assembling the vent
- Step 4. Connecting the sleeve vents with the lining
- Tailor's advice: how to avoid tightening the lining in the vent area
- Frequently asked questions (FAQ)
Anatomy of sleeve vents: upper and lower sides
The sleeve vent is located in the elbow seam of a two-seam (or one-seam with dart) sleeve. Structurally, the unit consists of two parts:
- Top side vent (overlapping):Cut out with a full seam allowance (usually 3-4 cm wide) on the top of the sleeve. This is where the loops and buttons are placed.
- Bottom side of the vent (backing):It is cut out on the bottom of the sleeve with an allowance equal to the width of the upper allowance, and serves as a backing for the upper part.
Step 1. Duplicating and marking spline allowances
To maintain a clear geometric shape, both sides of the slots and the bottom of the sleeve must be duplicated.
- Duplicate the hem allowance at the bottom of the sleeve and the entire vent area with thin coat or suit dubbing.
- Along the bend line of the bottom and the corners of the slots, glue strips of thread-stitched adhesive tape (dolevik) to protect the cuts from stretching.
- Using chalk or a disappearing marker, draw precise hem lines for the bottom of the sleeve and vertical fold lines for the vents.
Step 2. Processing the corner with an “envelope” (45 degree angle)
The “envelope” corner processing method allows you to get a flat, neat corner without excessive fabric thickness.
- Unfold the seam allowances at the bottom of the sleeve and the sides of the vent.
- At the intersection of the hem lines of the bottom and the fold line of the splines, mark the point of the apex of the corner.
- Draw a line at a 45 degree angle through the resulting point, restoring the angle of the envelope.
- Fold the corner of the sleeve with the right side inward along a diagonal line and stitch.
- Cut the seam allowance to 5 mm, trim the corner at the very top, not reaching the line 1.5 mm. Turn the corner right side out and steam through an iron.
Step 3. Stitching the elbow seam of the sleeve and assembling the vents
Fold the upper and lower parts of the sleeve with the right sides inward, aligning the elbow sections and control notches. Sew along the elbow seam from top to bottom, smoothly going around the upper shoulder of the slot and going into the corner. Press the elbow seam allowance onto the roller block. Iron the seam allowance on the top side of the vent to the top of the sleeve, and direct the seam allowance on the bottom side inward.
Step 4. Connecting the sleeve slots with the lining
Connecting the lining to the vent requires a loose fit overlap.
- Assemble the sleeve lining, leaving a technological hole (15–20 cm) in the front seam for subsequent turning of the product.
- Align the lining with the hem and sleeve vent, right side to right side. Sew the lining to the vertical edges of the vents and to the bottom of the sleeve.
- In the upper corner of the slot, cut the lining diagonally by 8–10 mm to carefully bend the shoulder of the seam allowance.
- Turn the sleeve through the hole in the lining, form an overlap of the lining (overlap 1–1.5 cm) along the bottom and steam the knot. Place hand or machine tacks on the hem allowances.
Tailor's advice
The main secret of a professional-looking vent is the obligatory overlap (overlap) of the lining along the bottom of the sleeve by 10–15 mm. Under no circumstances should the lining be stretched dry: when the elbow is bent, the stretched lining will pull the slot along with it, forming unsightly creases on the front side. Always include this fold lap when joining. And proven ready-made patterns from our catalog will help you sew jackets and coats with impeccable sleeves.
Frequently asked questions (FAQ)
What is the difference between a working spline on a sleeve and an imitation (false spline)?
The working (opening) vent has unfastening loops and buttons (typical for bespoke couture jackets). In a false vent, the allowances are overlapped and stitched tightly, and the buttons are sewn on top as decoration.
When to punch the loops on the sleeve slot?
The loop holes are punched and overcast after the sleeve has been completely WTO and the lining has been fixed, but before the final sewing of the technological hole in the lining, in order to fix the wrong side if necessary.
Why do you need a wooden seam bead for HTO splines?
The seam roller is placed inside the sleeve when ironing the seams. It prevents thick seam allowances and vent angles from imprinting onto the right side of the fabric.
Expertly designed patterns are the key to a perfect fit of any product. To be the first to learn about the intricacies of design, modeling and trends in the sewing world, subscribe to our video channel Pattern - Ready-made patterns.